Victory! January 26, 2008
 …Or at least not a total defeat.
Generally, it came out fairly well — well enough to attempt etching. I prepped the board by scrubbing it down first with regular scouring powder (Comet) and a sponge, then with alcohol and paper towels. For the laser print, I used magazine paper again (actually, pages from the LEGO catalog that came with my giant LEGO blocks), attached to either side of the board by tiny pieces of masking tape. I placed the heated iron on top of the board for about 10-15 seconds before starting to iron it down, which I did much more lightly and quickly than before (maybe one minute per side), smoothing out from the center. Etching took about ten minutes.
There are still some toner stains on the bare areas of the board and a few deeper scratches in the copper, but those are only cosmetic and will be removed later. The edges aren’t all as sharp as I’d have liked, but they should be functional. Several traces to the header on the left didn’t transfer and were drawn in with etch-resist pen. A couple of places where the traces squeezed by pads under the IC (just right of the headers) got connected; scraping at the toner with a dental pick before etching cleared that up nicely.
Some transparent, gummy substance got transferred to the left side of the board. I didn’t notice it until I’d already had the board in the ferric chloride. It may have been adhesive from the tape; the tape was never applied directly to the PCB, but the glue could have melted and run during the ironing. Whatever it was, it resisted etching and may short some of the header pins. If so, a couple of seconds with a Dremmel brush will take care of it.
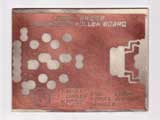 The front (top) side of the motor controller board also came out fairly well. As I’ve mentioned in earlier posts, very little on the top has any real function; I just etched away enough copper to prevent shorting out. A wide margin was given to every hole, which was fortunate; the two sides are off by a couple of millimeters (you can also see that the front’s design isn’t exactly square to the board). This may cause the top traces on the right to be misaligned; they will likely need to be removed via Dremmel and redone with a jumper wire.
As an experiment, I’ve put the full resolution images for this post on Flickr. If nothing else, it gives me an easy way to add notes to the images.
I can give you some tips i think will help. Ive gotten good boards with Extremely fine traces.
First and most importantly dont use tape.
On your board put differently shaped large pads around the edges. 3 will work great. Next surround the board with a parallelogram. That is there or placement. I your pcb software provides measurement you can set it up so that the paper folds over a two sided board (i havent mastered this). One side at a time – Print the pcb in the CENTER of the paper. Now align 2 sides of the parallelogram to the edges. Fold the paper over. Iron it. BTW i suggest a brillo pad and then rinsing with water rather than your process. Acetone probably leaves residue and isnt needed. Now iron as before. Let it sit and cool. Get out your sharpie and fix up the board. The sharpy makes a HUGE difference (going over the traces as much as possible). Now align the other side using lines and holes u put just for that. It might actually be a good idea to cover the second side (paint.. wax.. whatever) and etch the first side. Now the secon side. Align with lines/holes and repeat.
The whole trick here i think is the paper (ive come to the same conclusion you have), your ironing technique and especially the etching. I have a bubbler setup now and its Awesome though the sponge technique might work as well.
Hope this helpe and didnt sound “preachy” as i like your site.
C
PS look up cupric chloride. It rocks!